Operators

Operators are mathematically inspired calculations of properties. They can be anywhere from the Change of a property over a certain number of days to the absolute value of a calculation or even the exponential moving average of any criteria.

 Tutorial

Operators tell the screener what to do with the data you select. The data may be properties in the stock records, constants that are usually numbers you type in, like the 10 in the PE test, or variables you calculate and name. You will learn about variables later. Operators are the verbs in the screener. Properties, constants, and variables are normally the nouns.


You can think about operators belonging to categories like active, conditional, and implied if it helps. Operators such as “add” and “divide” are active—they command that a calculation be made. Operators such as “<” or “=” test a condition or relationship between two numbers. Implied in their use is the unstated “if this is true, then select the stock.” We call them “Booleans” or “True/False” operators. Operators such as “and” and “or” control how the various tests in a screener connect together or stand-alone.


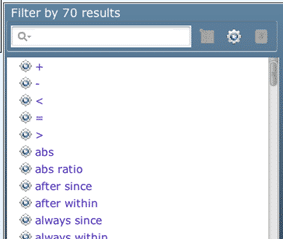
If you’ve worked with other programming languages or other stock screeners, many of the commands will be old friends. What may amaze you if you have been restricted to a screener where everything had to fit in a pre-defined matrix is how easily you can create much richer and more precise tests with Equihack. In addition, Equihack has almost 70 unique commands at the last count. Only the basic ones have been mentioned here. You can see the whole list by clicking on the Tools tab and clicking the Gear icon to the right of the Filter by the box. Commands are purple.

First, let’s look at how operators lay out empty boxes in screeners. Like the chef on TV who measures each element needed into separate bowls before mixing everything together, different operators lay things out differently depending on their needs. You can have more than one operator on a line. You can nest operators. You can have operators to the left of a true/false test or the right. This is why we recommend placing the operators on a line first, even though your English language statement of what is to occur probably starts with a property name.


Unless you are building code to calculate a variable or a formula (neither of which we have studied yet), each of your lines of code will have a true/false test in it someplace. Is this equal to that? Is this greater than that? Is this not equal to that--straight logic questions as laid out by the English Mathematician George Boole in 1854. As we saw in the first lesson above, when you put a true/false operator in an empty box, it surrounds itself with two empty boxes.


If you start a line of code with a property, say, rather than a true/false operator, Equihack will add a “>” and an empty box. This is a reminder of how things need to be. You can change the “>” to any other true/false operator easily.

Let’s construct a simple example with properties, true/false, multiply, and divide operators. We will build a basic two-line screener, but we are going to struggle a little along the way. Then we will go back and make a couple of common mistakes in the code. All this will introduce you to ways to debug and fix mistakes in Equihack. You may get lost along the way. Don’t worry; there is no test at the end. Enjoy the tour. When you find yourself in a similar pickle, return to this lesson and check out what steps we took. It will make more sense, then.


The screener we want to build starts with the idea that we want to follow the “smart” (well, big) money: where are institutional investors increasing their holdings? There are several ways to do this. The following steps may not be the most elegant, but they will serve to show you some things about Equihack’s grammar.


We will put the first line of the screen incorrectly. We want to screen for stocks where the number of shares that the institutions bought last quarter was 5 times greater than the number they sold. The basic equation for this is “purchased/sold > 5”.


We enter “>” in the first empty box. It gives us two new boxes. We enter “/” in the box to the left. It gives us two more new boxes. A blank test is laid out—all the operators are in place. We just need to add the nouns--some properties and the constant number we are testing for, in this case “5”.


If you didn’t zone out during the first lesson, you know there are at least a half-dozen ways to find and insert the desired properties on either side of the divide operator. We are looking for “Institutional” properties. The quick way is to just type “inst” in the left-most empty box. You will be prompted with 6 choices. The two we will be using are at the bottom of the list: Institutions_Shares_Purchased and Institutions_Shares_Sold. Highlight and select the Purchased choice for the first box and do the same for the Sold choice for the box to the right of the divide operator.


Two steps remain: enter “5” in the last empty box and click GO. In a few seconds, you will see a heat map with many stocks on it--at least when this was written during a bull market, there were over 500 stocks selected.


This result presents too many choices. It is not actionable. Is there a problem with the question or a problem with the data, or a bug in the program? Surely the question is reasonable :-> Let’s explore what was yielded. There are many ways to do this. Let’s pick a couple of quick ones for starters…


Click on the Tools tab (lower left corner). Type “inst” in the “Filter by” box and click the square spreadsheet-looking icon to the right of the box if you don’t see the desired list of properties below the Filter by the box. Click on “Institutional Shares Purchased” and drag it across the screen to the top line of the box called “Show in Results.” Then do the same thing with the property called “Institutional Shares Sold.” Both should now be stacked in the “Show in Results” box.


Click the GO button again. You will see the gray heat map again, but this time the beige “Results Overview” has more information. It tells you that sometimes these big boys sell as little as 1 share. It’s too easy to get some small stuff with our single-screener line.


Let’s look at some other facts about our initial results. Click the blue Results Table tab (4th from the left on the bottom line). You will see over 40 columns of information. The numbers we asked for start in the fifth column. You’ll see two columns of Purchases and two columns of Sold’s. Don’t worry why everything is doubled up—that happens because we are scanning as of today, and scoring change since the scan (today), so everything is gray, unchanging, and reported twice. We’ll go for color later in the other lessons.


You can click on the name at the top of any column, which will sort all the results by the values in that column.


Click the “Institutions Shares Sold” name. You should see a whole string of very low numbers. Grab the slider on the right and pull it down. You can see the values found with your screener, stock-by-stock. They look OK once you filter out the very low values. You can certainly look at other information by dragging the bottom slider to the right and sorting on other columns. Something may dawn on you to improve your screener algorithm in directions different from what you initially planned to do. But let’s stay focused on our simple screener…


We want the divisor to be in the big leagues, at least 40 million dollars sold to show real activity. A basic formula for that would be price x number of institutional shares sold > $40,000 (the shares are expressed in thousands, so 40000 is really 40 million dollars).


Click the green + icon to the right of the Stock Screener tab to add another condition. Put a > in the first box and an * (multiply) in the new box to the left to create areas for the needed properties and constants.


Click on the left-most box and enter “price” but you see nothing of interest. Click the Tools tab and enter “price” in the Filter by box. Now you see four possibilities if you dig through the list: Close Price, High Price, Low Price, and Open Price. Normally the Close Price is the favored choice. Drag it over to the empty box or type “clo” in the box. You will see Close prompted and highlighted. Press return, and you’re done.


In the second box, enter “iss” which are the first letters of the elements in the property named “Institutions_Shares_Sold.” You get two choices. Arrow-down to the second and press return. Then type “40000” in the last box and press GO.

At the time this was run, this two-line screener found around 35 stocks meeting both tests. You can double-check what the screener yielded in another way that may be interesting. Click on the “Results Breakdown” tab on the bottom row. Ignore any warning message and wait for a collection of pie charts. Some may be very interesting to you. For example, in our sample, a lot of the institutional money went into small and medium-cap stocks in the financial sector—at least 5 times as much going in as going out.


So in this lesson, you’ve learned more about operators. We branched out from just looking at the resulting heat maps that show after GO is clicked in order to see actual numbers. By now, you may understand that the Boolean or True/False operators play a key role in this process. In the next lesson, you will learn more shortcuts and what happens when you add or move operators on an existing line.


Summary

Adding an operator by typing

Begin typing the desired operator, and then it will auto-complete. Then you can press the up and down arrow keys to select the appropriate object. When the focus is on the appropriate object, press enter

Adding an operator by mouse

Click on an empty or filled box, then select insert → Insert Operator.

The Tool tab will open at the bottom of the program. Now click on an operator, and it will be inserted into the empty box.

Adding an operator from the drop-down menu

Clicking and Dragging

You may also click and drag an operator from the Tools Tab into a box.

In an empty or filled box, click and drag the greater than operator from tools into it.

 Click here for a list of supported operators!